Thursday, March 4, 2010

Remove AutoPlay Handler from the Options List in Windows 7 / Vista / XP

AutoPlay or AutoRun dialog pops up whenever a removable drive such as digital camera or CD/DVD disc has been inserted into computer or placed into optical drive, with plenty of action choices in a list of options for users to choose to perform. Each item in the AutoPlay list is a handler installed by various applications to show as an option for a particular events or content types such as Pictures, Videos, Data, etc. By a simple change in registry, you can remove an entry or item from AutoPlay menu.

Windows by default has several AutoPlay handlers, and other third-party programs, especially media player such as RealPlayer, image burning software such as Nero adds its own AutoPlay handlers and shortcuts into the list. Over the time, the AutoPlay list can get longer and longer, and some entries can become invalid or orphaned even when the program has been uninstalled and the AutoPlay handlers are not removed.

Remove Handlers By Registry Editing

If the modification to the registry goes wrong, it may causes instability. So if you plan to remove any handlers directly from the registry, backup your registry before modifying.

Go to Start and click Run, in the dialog box type regedit and hit Enter.

AutoPlay Handlers are located at the following registry location in Windows:

HKEY_LOCAL_MACHINE \ Software \ Microsoft \ Windows \ CurrentVersion \ Explorer \ AutoplayHandlers \ Handlers \

handler

HKEY_LOCAL_MACHINE \ Software \ Microsoft \ Windows \ CurrentVersion \ Explorer \ AutoplayHandlers \ EventHandlers \

handler

To remove a particular handler, delete the registry key from from the Handlers pane and also delete the corresponding registry key from the EventHandlers pane.

For example if you want to remove VLC player autoplay handler for DVD movies, then you will have to remove the VLCPlayDVDMovieOnArrival key from the Handlers pane.

vlc handler

And also delete the corresponding key in PlayDVDMovieOnArrival in EventHandlers pane.

event

The Registry Key for VLC Player is used just for an example, it is not recommended by the author to delete its autoplay handler.

Using A Software

An orphaned or invalid junk entry might appear in the AutoPlay list of options window, as a result of incomplete uninstall of a software. The CleanHandlers helps you remove the invalid entries from the listing. Even if you’re not aware that an item is invalid, this utility can find invalid AutoPlay entries and also remove them automatically.

cleanhandlers

Wednesday, January 6, 2010

Internet Explorer 7.0 can't add favorites "Unable to create XXX: Unspecified error".

Internet Explorer 7.0 can't add favorites

"Unable to create XXX: Unspecified error".


If you have moved the location of your Favorites folder, IE7's Protected Mode will prevent you from being able to write to the new location and will cough up an unspecified error when you try to save a web page to your Favorites. Here is how to overcome this:


1. Close Internet Explorer.

2. Click the Start button.

3. Click All Programs.

4. Go into Accessories.

5. Right-click on Command Prompt.

6. Select Run as administrator.

7. When the UAC Prompt appears, click Continue.

8. At the command prompt, go to the new location for your Favorites folder.

9. Input this command without the quotes "icacls favorites /setintegritylevel (OI)(CI)low"

10. Press Enter on the keyboard.

11. Close the window.

-------------------------------------------------------------------
icacls - the name of the command were using

/setintegritylevel - the function used (in pretty plain english, Thanks Microsoft.)

/OI - object inherit, ie, the files get the same integrity level as the folder they are in.
/CI - container inherit, ie, folders get the same integrity level as the folder they are in

-------------------------------------------------------------------


I also had to run this command on my "C:\Users\%USERNAME%\AppData\Local\Temp" and "C:\Users\%USERNAME%\AppData\Local\Temp\Low" folders in order to print from IE. Replace "%USERNAME%" with your username.

How To Convert DMG To ISO on Mac OSX, Windows and Linux

Here are ways that you can convert dmg files to iso files on Mac OSX, Windows and Linux.

Before we start, let’s download a dmg file from the public domain. I found one on Apple’s article about The XMLHttpRequest Object website while I was learning Ajax and that can be downloaded from this link. This is just a 150KB dmg file and will be handy if you want to have something to test with while you’re following this tutorial.

How to convert dmg files to iso files on Mac

Method 1: Using the Mac terminal
1. Open a terminal window from Finder > Applications > Utilities > Terminal.

2. Assuming that you have a disk image called apple.dmg in the current directory, type

hdiutil convert apple.dmg -format UDTO -o apple.iso

3. This will actually create a file called image.iso.cdr in the current directory (even though we asked for the output to be image.iso). This file can be safely renamed to image.iso, copied to a Windows server or machine, and burned with your CD/DVD burner of choice.

Generally, the command hdiutil can be used this way:

hdiutil convert /path/to/filename.dmg -format UDTO -o /path/to/savefile.iso

Method 2: Using DMGConverter (freeware)
1. DMGConverter is a disk image (.dmg, .cdr, .iso) creation and conversion tool which is simple and easy to use. It is a very useful tool for the collective processing of more than one file and every folder, and it can deal with all the fundamental processing with the drag & drop of the file/folder. For Mac Only.

How to convert dmg files to iso files on Windows

This is for Windows users who might have downloaded a dgm file and wondering how to extract the content, or not even knowing how and what to do with the dgm file. I’ve been there at a certain stage. the sharewares mentioned are fully functional and allows you to use the “convert dmg to iso” function even when it’s not registered yet.

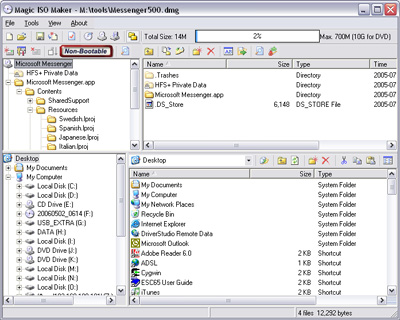
Method 1: Using MagicISO (shareware)
1. Download MagicISO, install and run program.

2. Click to open dmg file.

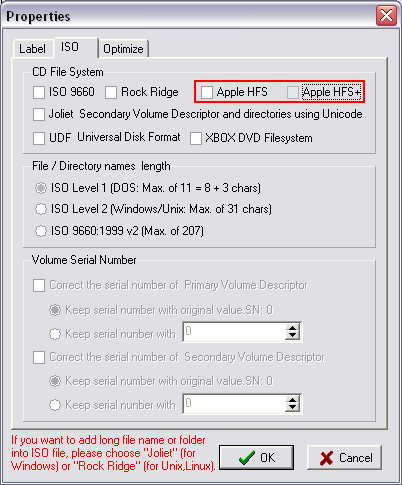
3. Click to open “Properties” dialogs.

4. Uncheck Apple HFS and Apple HFS+

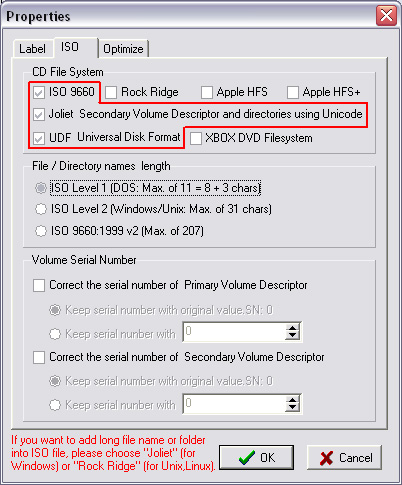
5. Check “ISO 9660″ “Joliet” “UDF”

6. Click OK

7. Click to save as to iso image, or click to burn to CD/DVD without saving.

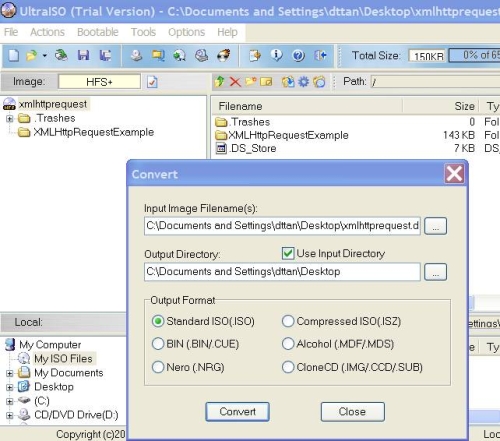
Method 2: Using UltraISO (shareware)
UltraISO basically does the same thing, but it can save you time from doing step 3 to 6 compared to method 1.

Alternative Solutions: dmg2iso (freeware) and isobuster (shareware)
I’ve heard and read that some people had been able to convert dmg files into iso files using dmg2iso (freeware). I’ve tried dmg2iso, converted my dmg file to iso without problem, but the converted iso file is corrupted and can’t be open by any tools (Daemon Tools, Alcohol, MagicISO, UltraISO and ISOBuster) that I’ve tested. It might work for you, but no guarantees.

ISOBuster is pretty similar to MagicISO and UltraISO. But too bad that the function to “convert dmg to iso” is restricted and won’t be functional until you buy the software.

How to convert dmg files to iso files On Linux

Free open-source app AcetoneISO provides a great deal of disc image manipulation tools not found in the Gnome desktop. It can mount/unmount a variety of image formats (ISO, DMG, MDF, NRG, BIN, NRG), convert images, create, encrypt, and decrypt ISOs, play DVDs (with the required codecs installed), and much more. It is particularly useful for mounting proprietary formats found in Windows and Mac boot discs. AcetoneISO is a one-stop-shop for all of your CD/DVD image manipulation needs, and is a free download for Linux only. This works on all famous linux distro such as Ubuntu, SUSE, Fedora, Mandrake, and Redhat.

So there you have it, and this should get you covered no matter what operating system you’re using.

Mac OS X 10.6 Snow Leopard (Final Retail) installation

Apple

Mac OS X 10.6 Snow Leopard

Build: 10A432 "Golden Master"


• Better. Faster. Easier.

Snow Leopard enhances your entire Mac experience. In ways big and small, it gets faster, more reliable, and easier to use. It’s the Mac you know and love, made even better. Learn more


• Next-generation technologies.

New core technologies in Snow Leopard unleash the power of today’s advanced hardware technology and prepare Mac OS X for future innovation. Learn more


• More accessible than ever.

Every Mac comes with assistive technologies that help people with disabilities experience what the Mac has to offer. The innovations in Snow Leopard advance accessibility even further. Learn more


• Exchange support.

Mac OS X Snow Leopard includes built-in support for the latest version of Microsoft Exchange Server, so you can use Mail, iCal, and Address Book at home and at work. Learn more


• Languages

English • Japanese • French • German • Spanish • Italian • Dutch • Swedish • Danish • Norwegian • Finnish • Traditional Chinese • Simplified Chinese • Korean • Brazilian Portuguese • Portuguese (Portugal) • Russian • Polish

http://www.apple.com/macosx/

Description: Mac OS X version 10.6 "Snow Leopard" is the seventh major release of Mac OS X, Apple?s desktop and server operating system. The upgrade to Mac OS X focuses on improving performance, efficiency and reducing its overall memory footprint compared to its predecessor Mac OS X v10.5 ?Leopard?, rather than new end-user features. This is also the first Mac OS release dating back to System 7.1.2 that does not support the PowerPC architecture, as Apple now intends to focus on its current line of Intel-based products.

General requirements
* Mac computer with an Intel processor
* 1GB of memory
* 5GB of available disk space
* DVD drive for installation
* Some features require a compatible Internet service provider; fees may apply.
* Some features require Apple?s MobileMe service; fees and terms apply.

More Information:http://www.apple.com/macosx/

[ Installation Tutorials ]

Burn Using DVD-DL

What you need:
- Disk Utility.
- DVD-DL (Dual Layer/DVD9).
- DVD+/-R DL Burner.

1. Open the 'Mac OS X Install DVD.dmg'
2. Open Disk Utility. On the left navigation, select the image (Mac OS X Install DVD).
3. Click 'Burn' to burn on your dual layer DVD.
4. When the disc is burnt, restart your computer and hold 'c' to boot from the dvd.
5. Follow the instructions to install Snow Leopard.


Install via USB Flash Drive

What you need:
- Disk Utility.
- Flash Drive with at least 8GB of free space.

1. Open Disk Utility. On the left navigation, select your flash drive and click on the "Partition" tab.
2. Under "Volume Scheme", Select "1 Partiton"
3. Once selected, hit the "Option" button at the bottom of the map.
4. A window will pop-up, select the GUID option (the first one).
5. Once its done, navigate to the "Restore" tab.
6. With the Snow Leopard DMG present, drag the DMG to the "Source" field, and from the navigation on the left, drag your Flash Drive to the "Destination" field.
7. Click Restore.
8. Close Disk Utility, Open up System Preferences. Under "System," choose "Startup Disk," Your flash drive should be listed as the Snow Leopard installation disk. Select and press "Restart"
9. Follow the instructions to install Snow Leopard.

Install via External Hard Drive

What you need:
- Disk Utility.
- External Hard Drive with at least 8GB of free space.

1. Open the 'Mac OS X Install DVD.dmg'
2. Plug in your external harddrive.
3. Open up Disk Utility.
4. Select your external hard drive on the left.
5. You'll see "First Aid, Erase, Partition, RAID, Restore"
6. Click on Restore.
7. You'll see two fields Source: and Destination:
8. For Source: select 'Mac OS X Install DVD.dmg' from wherever it is on your harddrive.
9. For Destination: drag you external hard drive from the Disk Utility drive list.
10. Click on Restore.
11. Close Disk Utility, Open up System Preferences. Under "System," choose "Startup Disk," Your external drive should be listed as the Snow Leopard installation disk. Select and press "Restart"
12. Follow the instructions to install Snow Leopard.